How to Build a Predator-Proof Chicken Run
When we moved to Maine in 2015, we were lucky enough to have a beautiful coop from Horizon Structures delivered soon after we moved in for our chickens and ducks.
Because we live in the woods and have to worry about predators like foxes, coyotes, hawks, eagles, raccoon and fisher cats, we spent the next several weeks building them an attached run.
I incorporated some neat features and lots of predator-proofing to keep our chickens safe and happy when we aren't outside with them and they can't be out free ranging.
It took us a lot longer than we expected due to my travel schedule and other commitments, but every free minute we had, we worked on it.
We didn't quite finish - we lost our race against winter - but we'll finish up in the spring. In the meantime, our chickens and ducks have a nice 18x40 foot run where they're safe and happy during the day.
They enjoy a bit of supervised free range each afternoon that the weather permits during which they get to stretch their legs, scratch for bugs and worms and eat weeds and grass.
But the run keeps them safe the rest of the time, while providing them plenty of room.
How to Build a Predator-Proof Chicken Run
Step by Step Instructions | I tried to take lots of photos as we went along, so I could walk you through the process. We were fortunate to find a barn full of scrap wood, so we improvised where we could with what we had instead of buying lumber.
Now, remember, we're not professional builders. I've build smaller coops, bookcases, stuff like that. But I do watch alot of HGTV and DIY Network .... so we just did what we thought would work, and we're super happy with the results!
I will apologize in advance... there are a LOT of photos! But since I wasn't exactly sure how to describe everything, I figured the more photos the better!
Materials to Build a Predator-Proof Chicken Run
4x4 fence posts
Quikrete
2x4 boards
1x6 boards
1/2" welded wire fencing
1" welded wire fencing
Chicken wire
Staples (U-shaped nails)
2x2 boards
Plywood
Wood screws
Hinges, spring-loaded eyehook, spring
Paint | we used Benjamin Moore Galapagos Green
The Plan for our Chicken Run
The first thing we did was pace out exactly how big we wanted the run to be and where it would be located.
We ended up making it about 16x40, far larger - at over 600 square feet - than we needed for our 12 ducks and 11 chickens, but bigger is always better when it comes to run size.
Prepping the Ground and Setting the Posts for our Chicken Run
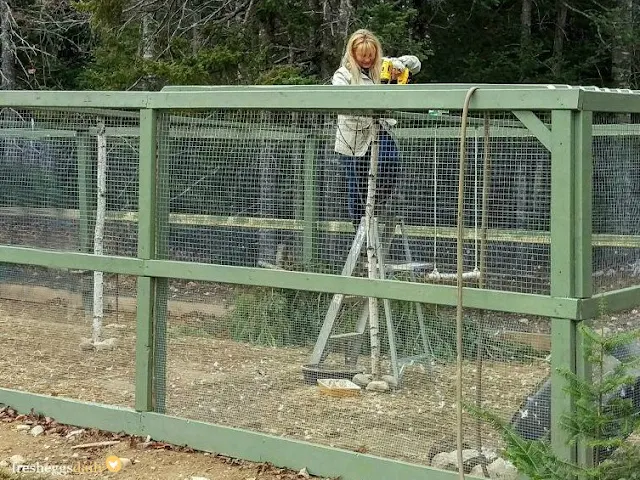
With the tractor, we scraped sort of a trench around where the perimeter of the run would be so we could sink the fencing into the ground a few inches to deter digging predators.Then we marked off 8 foot lengths and started digging holes for the fence posts. We chose 8 feet because that's a standard board length, so that would eliminate cutting lots of the boards.
After digging the holes, we positioned the fence posts, poured Quikrete and water in the holes then refilled them with dirt.
We attached pieces of scrap wood to support the posts until the concrete set. We even ran rope across the tops of the posts to make sure they were all level (that's a trick I learned from the DIY Network!)
Predator-proofing around the Base of our Chicken Run
Once the concrete had set, we screwed boards across the top to further secure the posts, then it was time to start nailing up the fencing. First we laid chicken wire along the ground in the trench.
Chicken wire isn't technically predator-proof, but since it was a second layer of defense and we had a roll lying around, that's what we used. We would also be sinking the welded wire fencing into the ground all the way around as well to prevent diggers.
Just a note: if you decide to use chicken wire for your run, you might as well just let your chickens free range because chicken wire is useless. It won't keep out dogs, fox, raccoons, etc. So go with welded wire. Trust me, you'll be glad you did.
The 1/2" welded wire went down about 8" into the ground and is slightly curved out in like a J-shape. That's really all you need, but since we had leftover chicken wire, I just laid that on the ground and then shoveled some dirt over it.
The chicken wire should also help prevent the chickens from scratching up the grass that hopefully will (eventually) grow back around the perimeter of the run! But you can just dig your trench and put the fencing down a few inches, as long as you curve it out, that will stop a digger in its tracks.
Attaching the Welded Wire to the Sides of our Chicken Run
Then we started attaching the fencing to the fence posts using the staples (they're not like staple-gun staples, they're nails shaped like a "U").
We used 1/2" welded wire fencing along the bottom three feet of the run to prevent smaller predators like mice or snakes from getting in - or a brave raccoon from reaching in - and then used 1" welded wire fencing along the top.
That was mostly a cost consideration. Using 1/2" on the whole run would be the most predator-proof way to do things, but since this is just a day run, the 1" is fine.
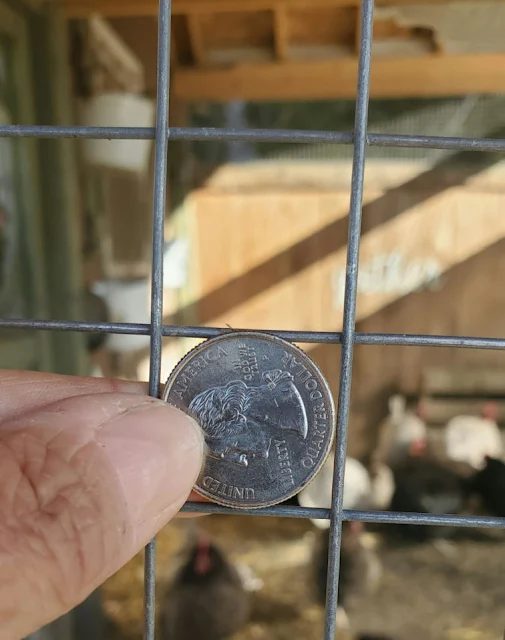
It will keep out all predators except a small weasel which can fit through a hole about the size of a quarter. We only have the larger types of weasels here in Maine, so the 1" along the top will be sufficient.
Plus, weasels are mostly nocturnal and we lock our chickens in the coop at night and have solar predator lights around the coop and run as further security measures. But if you have least or other small weasels where you live, then using 1/2" on your entire run will be the safest option.
Once we had the bottom roll of fencing on, we screwed 2x6 boards along the bottom to further secure the fencing and finish off the bottom. Winston even gave us a good demonstration as to how it was impossible to dig underneath!
At that point, we got 2x4s screwed up at the midpoint and then got the top half of the side fencing nailed up and 2x4s along the top also.
Of course the chickens (and Bella) were a huge help during the entire project!
Next, I measured the doorway and built a door for the run. That was the most fun part, I think!
Painting our Chicken Run
At this point we took a break and I decided to paint all the exposed wood. We also cut and painted the 2x2s that we had decided to use for part of the top of the run.
We were going to make a sort of pergola-style roof at the far end of the run.
It would keep larger predators from being able to climb up the side and get in, yet still allow in some sunlight while being sturdy enough to hold up to Maine snowfall in winter.
A friend who was visiting helped me cut the boards using my brand new compound miter saw! So fun to get a new power tool!
I chose Galapagos Green from Benjamin Moore for the paint color. I love the subtle pale green color. It really blends into the woods in the background so nicely.
Creating the Top of our Chicken Run
For the pergola top of our chicken run, we angled the ends of the 2x2s and then screwed them to the top support boards using wood screws. We spaced them the width of a 2x4 apart to make for each spacing using a scrap piece of 2x4.
That trick I might have also seen on the DIY Network...or I might have made it up myself, not sure. I love how it ended up looking - and love that it was not only economical, but also really functional as well. I think my pal Sara Bendrick would be proud!
Adding Support Posts to our Chicken Run
Because we are surrounded by birch trees, we used some cut trees as center supports for the run instead of using lumber.
I also made the chickens a swing out of a short birch log. I love how that makes the run blend right into the woods behind it.
Note: we ended up adding more support posts several years later - scroll down to the bottom to read the modifications we've made over the years.
Adding a Solid Roof to our Chicken Run
We used plywood screwed to a wooden frame that we attached right to the side of the coop. We were starting to run out of time, so we didn't get to shingle the roof, but we'll do that in the spring.
For now, we covered it with a tarp for the winter so the plywood won't rot. Again, it's very functional and was very inexpensive to build.
Finishing Touches for our Chicken Run
It was finally time to get the door installed using hinges and a spring-loaded eye hook. I also added a spring so the door would swing shut automatically behind me.
And of course I added a few cutesy signs (I couldn't make up my mind which I liked better!), some decorative scrap wood in the corners, and nails to hang some wreaths from that I can change depending on the season.We still had about half the top of the run left covered only with the welded wire, so for the winter, until we decide how we want to finish it off (and until we get the plywood roof shingled), we just stapled some poultry netting across the top. That will keep out aerial predators and be easy to keep free of snow for the winter.
So that's our new chicken run. We love how it all turned out. I'm not sure how much it would have cost had we had to buy all the materials, but if you have some scrap wood and fencing that you can use, you can really keep your cost down.
In the spring, we'll shingle the plywood roof, finish off the top (probably with 1' welded wire fencing), and then do some landscaping both inside and around the run.
Adding Welded Wire Across the Top of the Chicken Run
Well, we (finally) finished the top of the run. We removed the plastic poultry netting and used the same 1" welded wire fencing that we used on the sides across the top.
That will keep out any predators, but also hopefully allow some of the snow to fall through and not pile up on top and collapse the whole thing!
To cover the entire top only took my husband and me one afternoon and I'm so relieved to finally have it done!First we added some more 2x2 boards across the middle part that was open, to help support the fencing.
Then we measured the space, cut the fencing with wire snips, and after attaching a weighted rope to the edge of the fencing and tossing the rope over to the other side, pulled each section over the top and then secured it with heavy-duty U-shaped nails.
Check out how we finished off the top to make our run even more secure for our girls!So that's my new chicken run. It allows our chickens (and ducks) plenty of room to exercise and move around, but keeps them safe from the many various predators we have lurking.
Update Summer 2020
Some more Landscaping In our Chicken Run
I decided to add some felled evergreens from the woods to give the run more of a "woodsy" or "free range" feel for the girls.
After I trimmed the trees to the right height, I just stood them up in the run, wedged up against the top fencing so they would stay in place.
They'll stay green for weeks and weeks, then I toss them back in the woods and find some new ones that either have come down in a storm or need to be thinned out.
And then I added twinkle lights and some cute floral cotton fabric bunting. Because... why not?
Update Summer 2021
Adding a Pitched Roof over our Chicken Run
Because I was afraid that the top of the run would eventually collapse under the weight of all the snow we get here in Maine, and it's really kind of a pain to climb up there and brush the snow off with a broom or shovel, we finally had someone come and build a more permanent, sturdy pitched roof over about 1/3 of the run. And I LOVE it!
So now the part that is attached to the coop has a nice slanted roof that I don't have to worry about shoveling and where I can put the feed, water, treats, dust bath, etc. so it's out of the elements.
It gives the chickens and ducks more shade in the run also (at least until the lilac and rose bushes I've planted get a bit larger).


