5 DIY Seed Starter Cup Ideas on a Budget
In Zone 5b, where I live in Maine, typically the last frost date is around May 15th, and the first average frost date in the fall is around October 15th, leaving me just 150 days – give or take – to get seeds planted, sprouted, grown, and harvested.
Starting seeds indoors before the actual growing season officially begins is extremely beneficial, especially in places like Maine where the typical growing season might only be barely longer than the time certain crops need to mature to harvest – and in northern Maine, not long enough for some crops to start from seed outdoors.
In addition to lengthening the growing season, another nice thing about starting your seeds indoors is that you can keep an eye on the temperature and forecast and if you need to keep your seedlings inside a bit longer, or put them outside during the day and bring them back inside at night before they're ready to be transplanted permanently, you can.
Something you can't do once you've planted your seeds outside in the ground (although you can cover them to protect them from an unexpected cold snap or frost).
But you do get a bit more flexibility with seeds started in the house.
Something you can't do once you've planted your seeds outside in the ground (although you can cover them to protect them from an unexpected cold snap or frost).
But you do get a bit more flexibility with seeds started in the house.
Starting seeds is fairly easy.
You need some sort of container, potting mix (Espoma makes a nice organic one) and of course the seeds. Plastic wrap and a misting squirt bottle also come in handy.
After filling your containers with potting soil, press a few seeds into the soil, cover lightly with more soil, mist well to moisten the soil but not saturate it, then cover each container with a piece of plastic wrap and set them in a warm spot in your house – the top of the refrigerator or over a radiator are good choices.
Keep the soil moist, and once your seeds sprout, you can remove the plastic wrap and set your seeds in a sunny windowsill or under a grow light.
Seed starter cups are available commercially, but that can get expensive. If you reuse plastic cups from a previous year, be sure to wash them out well to prevent soil-borne bacteria from infecting your new seedlings.
A more economical idea is to repurpose some items you likely have around the house into seed starter cups. Here are some of my favorites:
A more economical idea is to repurpose some items you likely have around the house into seed starter cups. Here are some of my favorites:
Eggshells
Save your eggshells. You can use them as seed starter cups! Rinse them out, then poke a small hole in the bottom for drainage. Eggshells are great to use for those crops that require extra calcium (such as tomatoes, peppers and eggplant), because the calcium in the shell will leach into the soil to feed the plant.
Set the shells into an egg carton once you’ve filled them with potting soil and planted your seeds and place them in a sunny windowsill.
When you’re ready to transplant the seedlings, just crush the shell a bit with your fingers, and plant the whole thing in the ground.
Set the shells into an egg carton once you’ve filled them with potting soil and planted your seeds and place them in a sunny windowsill.
When you’re ready to transplant the seedlings, just crush the shell a bit with your fingers, and plant the whole thing in the ground.
Eggcartons
Or, if you want, skip the eggshells and plant your seeds right in the egg carton!
You'll want to use a cardboard carton - not plastic or styrofoam of course. When you're ready to transplant, carefully cut each carton section apart and plant it right in the ground.
The cardboard will decompose, adding organic matter to your soil.
You'll want to use a cardboard carton - not plastic or styrofoam of course. When you're ready to transplant, carefully cut each carton section apart and plant it right in the ground.
The cardboard will decompose, adding organic matter to your soil.
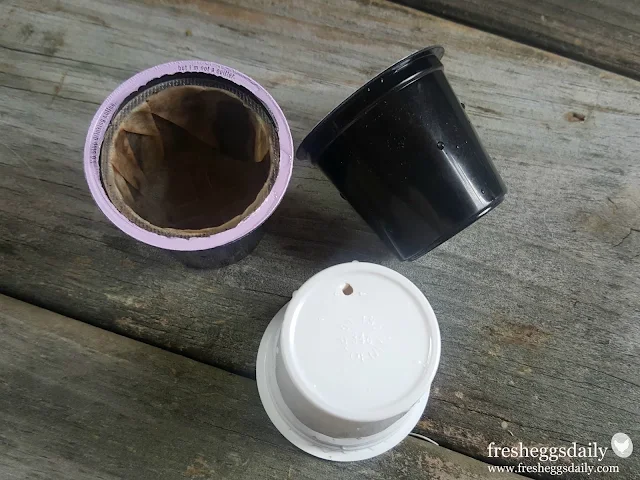
K-Cups
If you have a Keurig coffee machine, those K-cups are perfect for starting seeds.
They already have a drainage hole in the bottom, so all you need to do is rinse out the coffee grinds (dump them in your garden for a free soil amendment) and fill them with potting soil.
You will need to take the seedling out of the cup to plant it outside. (and yes, they're made of food-grade plastic!)
Toilet Tissue or Paper Towel Rolls
Start saving your toilet paper rolls. Paper towel rolls work also if you cut them into thirds.
To make an easy seed starter cup, cut four notches in the bottom of each roll, then fold them inward (as if you are assembling a cardboard box) to make a solid flat bottom.
To make an easy seed starter cup, cut four notches in the bottom of each roll, then fold them inward (as if you are assembling a cardboard box) to make a solid flat bottom.
When you’re ready to move your seedlings outdoors, simply unfold the bottom and plant the whole thing in the ground. The cardboard will decompose into the soil.
Newspaper
Old newspapers also make inexpensive seed starter cups and are best for the larger plants. Rip a sheet of newspaper in half, fold it in half, then wrap it around a tin can, soda bottle, glass or other cylindrical object.
Tape the seam to secure it, then fold the bottom and tape that as well. Fill with potting soil and water.
When you’re ready to transplant your seedlings, you can just untape the side and bottom seams and plant the seedling, or put the newspaper and all right into the ground.
Tape the seam to secure it, then fold the bottom and tape that as well. Fill with potting soil and water.
When you’re ready to transplant your seedlings, you can just untape the side and bottom seams and plant the seedling, or put the newspaper and all right into the ground.
I hope this has given you some ideas of easy ways to make seed starter cups for practically nothing.
And here's a handy planting zone map to help you figure out when you should be starting the seeds of various crops indoors to get a jump on the growing season, depending on where you live.
Provided by the USDA, it lets you enter your zip code to find your zone. Click on the photo to find your zone.


