Brooding Chicks on the Cheap
Chickens, a coop, run, fencing, feed, supplements, waterers, feeders, first aid supplies ... the costs can add up when you're preparing for your backyard flock.
But getting started with baby chicks doesn't have to cost you an arm and a leg.
Here are a few clever tips to help you get started for less...but you'll need to start stockpiling some things (if you don't already have them around the house) in advance of bringing your chicks home this spring.
Brooding Chicks on the Cheap
You can bet that my grandmother (or yours) didn't run out to the feed store and load up on fancy feeders and waterers and all kinds of supplements each spring when she had chicks hatching.
She was a stereotypical New Englander and VERY thrifty. Okay, to be entirely truthful, she hatched her chicks under broody hens, they free ranged all day and she just tossed their feed out on the ground, etc. so her cost was practically nil!
But you get the idea - even if you don't have a broody who wants to cooperate and act as the portable heater and temporary home for your chicks, it's entirely possible to raise chicks for not a lot of money. Here's how.
The Brooder
Baby chicks need a nursery to live in until they're big enough to live outside in their coop. It's called a "brooder" and can be as simple as a cardboard box. Done. (Or if you have a stock tank, galvanized tub or large plastic tote, you can also use that.)
Brooder Bedding
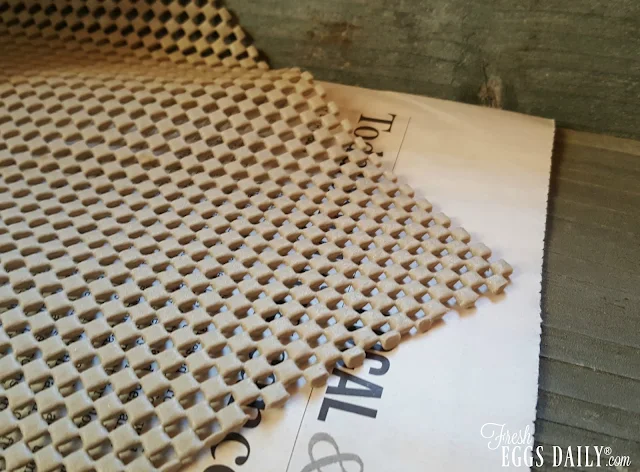
The brooder needs something soft and grippy and absorbent on the bottom to keep water messes and poop under control. The easiest (and cleanest) thing I've found is a few layers of newspapers with a piece of rubber shelf liner on top.
When the brooder needs cleaning, the newspaper simply gets tossed and the shelf liner can be rinsed or hosed off, allowed to dry, and reused. (Cutting a few pieces helps so you can swap a new clean one in while the old one is drying.)
Look around and see if you've got a few scrap pieces or a bit let on the roll from when you last used your shelf liner - it's the kind of thing no one ever seems to throw out!
If not, you can pick up a small roll for just a few dollars.
Feeder
You can buy a commercial chick feeder (there are several styles available) or you can simply cut the top off an egg carton and fill it with chick feed. Toss it when it gets dirty.
Chick Feed
Speaking of feed, baby chicks do need a good-quality chick feed to get a good start in life, so I wouldn't skimp there, but they don't eat much when they're that small, so your cost will be minimal.
You can also scramble up eggs as a treat for your chicks (super nutritious - they contain everything a baby chick needs in life except Vitamin C - and don't worry, they won't turn your little chicks into cannibals or egg eaters!) and your chicks will love them.
That will help stretch the feed bill a bit longer.
Chick Grit
Baby chicks, like adult hens, need grit to help them digest their food since they don't have teeth. There is special chick grit available commercially.
But a dish of coarse dirt from outside will suffice. I save all kinds of plastic containers, from take-out or that produce comes in, throughout the year to use in my brooder.
They come in so handy - and they're free. The nice thing is that the dish of dirt will double as a little dust bath that your chicks will love taking turns flopping around in.
Chick Waterer
Chicks need a special chick waterer, small dish or container for their water.
A shallow plastic lid is perfect for their first few days, then you can replace it with slightly larger containers as your chicks grow. You will need to put some stones in the water dish for the first week or so to be sure the chicks don't accidentally fall in and drown.
Baby chicks are incredibly top-heavy and accidents happen. It's important to check the water frequently to be sure it's clean and not soiled with poop.
Chick Electrolytes
It doesn't hurt to offer baby chicks some electrolytes for the first few days - especially if they were shipped -to give them energy and replace any nutrients lost.
A sprinkle of sugar in their water, or a few drops of honey, is a good substitute. Or you can make your own electrolytes by mixing 2 teaspoons sugar, 1/8 teaspoon salt, and 1/8 teaspoon baking soda into a gallon of water.
Brooder Heat
The one thing you really can't get around buying is a heat lamp. The brooder should be 95 degrees the first week, and then you can lower the temperature 5 degrees a week after that (although watch your chicks for guidance on the temperature.
Happy chicks scamper around peeping quietly. Cold chicks huddle and peep loudly.
If you keep your house pretty warm or can situate the brooder next to a radiator or wood stove, you might be able to get away with
Light bulbs are incredibly inefficient - meaning that 90% of the energy goes out as heat not light, which is good news if you're using it for heat! If you use a light bulb, your chicks will love if you hang a feather duster in one corner, just an inch or two above the ground (far away from the bulb, of course!).
Your chicks will love snuggling under the feather duster. It will give them a sense of security, give them a bit of darkness in which to sleep - and keep them a bit warmer too.
You might also consider draping a wool blanket or heavy towel over the top of the box, leaving a bit open for air flow, to help retain the heat a bit better than an open or screen top might.
Just remember that cardboard boxes are flammable, so whatever you use for heat shouldn't become a fire hazard. If you are planning on using a wood stove, radiator or fireplace as a heat source, you might be better off using a large galvanized wash tub as your brooder.
And remember that chicks need consistent heat 24/7.
Saving a little money raising your chicks, where you can, is a good way to get started with your backyard flock without it costing you too much. Save your money for a safe coop and nice, large secure run for them once they move outside!
That's an area where skimping can mean a world of hurt for your chickens.


