

Hatching Eggs under a Broody Hen
If you raise chickens, you owe it to yourself to try letting one of your broody hens hatch some eggs - at least once.
The experience of watching a mother hen with her chickens is fascinating and heart-warming and all the feels.

There are definitely pros and cons to using a broody hen instead of an incubator - or starting with day old chicks, but I think on the whole, there are way more pros than cons to hatching eggs under a broody hen.
Other than providing your broody hen with a nice quiet place to nest and feed and water close by, you don't have to do anything special.
She will keep the eggs warm, turn them and then when the chicks hatch, she'll have them outside withing a day or so, teaching them how to find food, look for bugs, what's good to eat and what's not, how to hide from predators and how to take dust baths. All the life skills chickens need to know!

Hatching Eggs under a Broody Hen
However, one of the disadvantages of hatching eggs under a broody hen is that you're going to need a broody hen!
And the timing of that might not match up to exactly when you wanted chicks, but you kind of have to work with Mother Nature on this one (although there are some ways to encourage a hen to go broody).

Broody Breeds
There are also some breeds that are more prone to going broody including Silkies, Orpingtons, Australorps and Cochins.

Fertilized Eggs
Once you have a hen showing signs of being broody and wanting to sit on eggs, then you just need some fertilized eggs.
If you have a rooster, then you're all set. You can start collecting some eggs that you want to hatch. If you're not sure if the eggs are fertile, crack one into a bowl and check for the bullseye.
Then keep track (if you can) of which hen's eggs showed the bullseye and choose those to set. But, realistically, when you have a rooster, you can safely assume that all your hens' eggs have been fertilized.
If you don't have a rooster, you can look for fertilized hatching eggs from a local farm or online.

Chicks Hatched under a Broody Hen
In general, chicks that you raise in a brooder and handle often will grow up to be more friendly chickens, but I have had good luck with my broody hens letting me come visit and spend some quality time with their chicks!

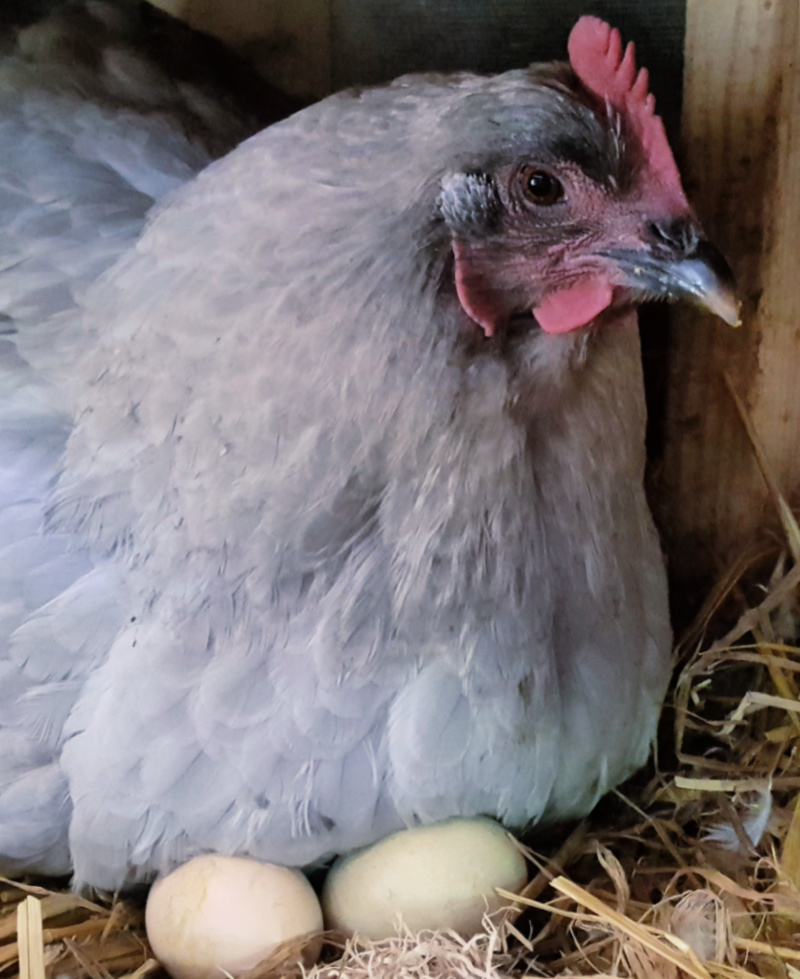
Annie and her Chicks

Meet Annie. She's an Australorp, which means she has the tendency to go broody (sit on eggs until they hatch instead of laying her daily egg and hopping right back out of the nesting box).
Australorps are known for their broody nature and Annie, true to her breed, goes broody quite often.

In fact, she helped me write my article on Breaking a Broody Hen last spring because we didn't have room for any more chicks and I wouldn't let her sit on infertile eggs.
But she really wanted to be a Mom.
So I promised her that this spring, if we could coordinate our schedules, I would let her sit on some fertile eggs. We did, and she did...and now Annie has five brand new baby chicks!

Hatching Eggs Under a Broody Hen
It's really quite simple to let a broody hen hatch a clutch of eggs (as compared to using an incubator) because she does all the work. She keeps the eggs warm and safe, she even turns them.
Then once the chicks hatch, she keeps THEM warm, shows them how to eat and drink, and keeps the chicks protected from the rest of the flock.

Encouraging a Broody Hen
Although you can't force a hen to sit on eggs to hatch them, you can encourage her. Just set the broody hen up a comfortable nesting box, large enough for her to turn around and keep the eggs turned ( ideally about 12-14" square), but dark and quiet.
The box ideally should be at ground level so any new chicks don't fall out (if its not, be ready to move the hen and her chicks once they have hatched to a safe, secure spot).
It's not recommended trying to move a broody once she has chosen where she wants to sit because that can cause her to stop sitting - although in Annie's case, she was so determined, I realized I probably could have put her with the eggs in the dog crate from the beginning and she would have continued to sit!
Be sure the box is filled with soft nesting material - straw or shavings work as does a piece of sod, grass side up - and make a concave bowl in the center so the eggs don't roll out.

Setting the Eggs under a Broody Hen
Once your hen has shown signs of going broody and you have the eggs collected that you plan on hatching (or you have received your fertile hatching eggs if you ordered them online or found them from a local breeder), place the fertile eggs under her and remove any "dummy eggs" you were letting her sit on in the interim.
Be sure to mark the eggs you plan on hatching with a pencil or Sharpie so you know which ones they are.
A standard-sized hen can comfortably sit on 12-14 eggs. While you are assembling your "clutch", store the fertile eggs pointed end down in a cool location such as a basement or garage and turn them several times a day until you have enough collected.
Eggs will generally stay viable for hatching for 7-10 days after being laid if stored properly, but won't start to develop into chicks until they are warmed under the hen for an extended period of time. You want to put all the eggs under your broody hen at the same time so they will all hatch together.
Remove Eggs Not Being Hatched
You will want to remove any additional eggs any other hens lay in the nest. Often other hens will lay her egg in the same nest, often while the broody is taking her short break to stretch her legs. Those eggs will be easily identifiable since they aren't marked and should be taken out or you'll have eggs at all different stages of development.
Don't handle the fertile eggs any more than necessary after your broody starts to set. They don't need to be candled. She should instinctively kick out any that are infertile or eggs in which the chick is not developing correctly or dies.
She will turn the eggs as she moves in the nest and will also rotate the eggs in the outer ring to the center periodically, so you don't need to worry about that either.

All you need to do is wait patiently. Twenty-one days later, your chicks should hatch. Interestingly, there is usually nearly a 100% hatch rate for eggs incubated under a broody hen, while the hatch rate using an incubator is generally far lower.
I have also read that when eggs are incubated under a hen, the ratio of females to males is slightly greater than when using an incubator.

But back to Annie....
As soon as I realized that Annie was broody again (a quick peek at her bare breast confirmed my suspicions after catching her sitting in the same nesting box on each trip down to the coop for the past day and a half), I confirmed that my order of hatching eggs was still on schedule.
My hatching eggs were due to arrive in two days, which was perfect timing.
I had ordered a mix of Blue Ameraucana, Coronation Sussex, and bantam Chocolate Orpington eggs - and I decided to put one of our Olive Egger eggs under Annie as well.

I removed two eggs other hens had laid in Annie's nest and replaced them with the hatching eggs. Annie gladly accepted the new eggs and settled in for the duration.
(Honestly I think she was quite surprised I didn't keep removing her from her nest as I had in the past!)

The Incubation Period
Over the 21-day incubation period, your broody hen will lose weight and her feathers will dull. This is completely normal. Be sure that she has easy access to both feed and water. She will leave the nest at least once a day to stretch her legs, eat, drink and poop.
She might not sit 24/7 the first few days, but that's okay, if she's dedicated to hatching, she will eventually settle in and sit day and night on her nest.
I put a feeder and waterer in the coop - something I don't normally do - but I wanted to make it easy for her to stay nourished and hydrated.
I also kept an eye on her and made sure that I saw her out in the run at least once a day.
She did leave the nest to eat and drink, then headed outside to take a few dust baths over the course of the next few weeks, and then would wander around a bit outside, but before long, she was back in the coop making a beeline for her nest.
Once I realized she seemed to know what she was doing, I sort of forget about her.
No worrying about losing power or the temperature on my incubator being inconsistent, no turning of eggs, no counting days or remembering about lock down. Annie had it under control.

Once the Chicks Hatch
Then one Saturday morning I went down to open up the coop and let everyone out and I heard faint peeping coming from the nesting box!
Annie's eggs were hatching right on time, the morning of Day 21.
Of course I spent practically the whole day in the coop checking on the progress of the pipping eggs. In all, five chicks hatched over the course of that day and the next. Eggs set at the same time will all generally hatch within 24 hours of each other.

The next morning, I hurried down to check and there were four chicks snuggled under Annie's spread wings. One additional chick hatched later that morning and I decided it was time to get everyone out of the nesting box.
There were three eggs left that hadn't hatched yet, but two never pipped and one seemed to have died in the shell. Annie continued to sit on the remaining unhatched eggs for several more hours and then seemed to instinctively know that they weren't going to hatch and started to move around more.
I wanted to keep Annie and her chicks separated from the rest of the flock in a safe place where the chicks could't squeeze through fencing or be vulnerable to predators for the first week or so to let Annie concentrate on being a mom. I used a dog crate set up on the floor of the coop, but any small cage works well.

I like to keep the chicks and mom separated for the first week or two (preferably right inside the coop so they are considered part of the flock right from the start) and then let her decide when it's time to introduce the chicks to the others.
It's important to note that baby chicks not hatched under a broody should NEVER be left in the coop or run with adult chickens. They need to be introduced slowly when they're older.
Annie was getting restless and the chicks were getting active and I was afraid they would topple out of the nesting box, so I carefully moved the whole family into a large dog crate on the floor of the coop filled with fresh straw, chick starter feed and a shallow dish of water.


What do the Chicks Eat?
The mother hen isn't currently laying eggs, and likely won't resume laying eggs until the chicks are about 5 weeks old, so she doesn't need the additional calcium in layer feed.

And the excess calcium in layer feed can damage chicks' kidneys if they are fed layer feed too early before they start laying. So everyone can have the chick starter feed while the broody hen is raising the chicks. And it's as simple as that.
The chicks weren't interested in any food for the first day or two, that's completely normal. Just before hatching they absorb the yolk of the egg which contains all the nutrients needed for life for about 48 hours.

But Annie sure dug in and soon enough began teaching the chicks to eat and drink. And in fact I caught a photo of Annie "tidbitting" for the chicks (showing them a particularly good treat).

Once the chicks started eating in earnest around day two, I added a bowl of dirt to provide the grit they need to digest their food and started adding cut herbs and weeds to their diet. Dandelion greens, chickweed, oregano, parsley and mint seem to be the big favorites.


Since they weren't vaccinated for Mareks and aren't eating medicated feed to guard against Coccidiosis, it's important to build strong immune systems so their bodies can fight off pathogens they encounter.
Just being out in the coop and scratching around in the dirt outside will expose them to tiny amounts which will also help build a natural immunity.
I also add the tiniest drop of apple cider vinegar to their water every few days and add brewer's yeast & garlic powder and probiotics to their daily feed.

Getting the Chicks Outside
Starting around day four, I let Annie and her chicks out for supervised outings at least once a day for some fresh air and so Annie can start to teach the chicks how to look for food, take dust baths and other critical chicken activities.

She gently coaxes them out of the crate and then out of the coop. They eagerly follow. She keeps them close and is ready at a moment's notice to fluff up and plop down on top of them if they get cold. She also puffs up when another flock member ventures too close, letting them know that the babies are hers and off limits.

I stick close as she teaches them what is good to eat and keeps an eye out for danger. At this young age, they are vulnerable to snakes, rats and even blue jays or crows, so I don't like to leave them outside alone unsupervised.
The chicks also can fit into very small spaces, so I don't want one slipping through a crack under the barn or somewhere I can't easily retrieve them if necessary.

Annie gave the chicks a lesson in dust bathing yesterday afternoon. Not much interest yet from the chicks, but soon enough they'll get the hang of it.
Pretty soon the chicks let Annie know they're getting cold, so everyone heads back to the coop. One last ruffle of her feathers to get the dirt out and Annie's ready to return to the crate.

Final Thoughts on Hatching Eggs under a Broody Hen
Using a broody hen to hatch eggs and raise chicks takes all the work out of it for you. The broody hen handles everything.
No heat lamps, no brooders in the house, and I think most importantly, no worries about trying to introduce new chickens to your flock since the baby chicks hatch right in the coop and are considered flock members from the start.
I've never had any of my adult chickens bother chicks hatched under a broody hen.

There can be some disadvantages to using a broody hen, though. I have heard that chicks hatched under a hen won't bond as well with a human and won't be as friendly as incubator-hatched chicks that are raising in the house in a brooder.
And some broodies are super protective of their chicks, but so far, Annie has been very tolerant of my incessant picture taking and handling of her babies, and the chicks are friendly and social.

That's one reason why I love Australorps so much. They are such sweet, docile hens.
Annie and her chicks will stay in the crate for another week or so and then move to a larger pen with an attached run separate from our laying hens until the chicks are probably just about 18 weeks old.
That way I can keep our layers in the main run eating layer feed and not worry about having pullets in with them who need starter/grower. Another option would be to put everyone in together and feed them all grower feed until the chicks are 18 weeks old, then switch everyone back to the layer feed.
By then Annie will probably be sick and tired of them and ready to hatch a new brood of babies!

Annie is doing a wonderful job. And she handled it all without the help of any hi-tech electronics or man-made devices. She keeps the chicks warm and safe and shows them what is okay for them to eat. She is a wonderful Mom.
I'm not quite ready to donate my brooder totes, heat lamps and incubator to Goodwill, but I have to admit that having Annie do all the work was a welcome change....and she is just LOVING it!


All rights reserved.


.png)
