5 Tips for a More Successful Hatch
Here are my 5 tips for a more successful hatch whether you are hatching baby chicks or ducklings in an incubator.
Hatching fertile chicken (or duck) eggs in an incubator or under a hen is a fun, rewarding experience.
If all goes well, after 21 days (28 for duck eggs) you should have healthy baby chicks popping out of the eggshells like popcorn!
But things can go wrong.
The hatch rate for incubated eggs isn't as high as for those eggs hatched under a hen, and for shipped eggs it's even lower. But there are several things you can do to ensure the best hatch possible.
If you can find eggs locally, or hatch your own eggs, that will likely result in the best hatch rate.
If you use your own fertile eggs, choose the cleanest, most perfectly shaped eggs for a better chance of hatching healthy chicks.
Jostling during shipping can damage the integrity of the insides of the egg -even if the eggs don't break - and that can interfere with eggs hatching.
However, ordering your hatching eggs from a reputable hatchery such as Meyer Hatchery, is recommended if you want breeds you can't find locally.
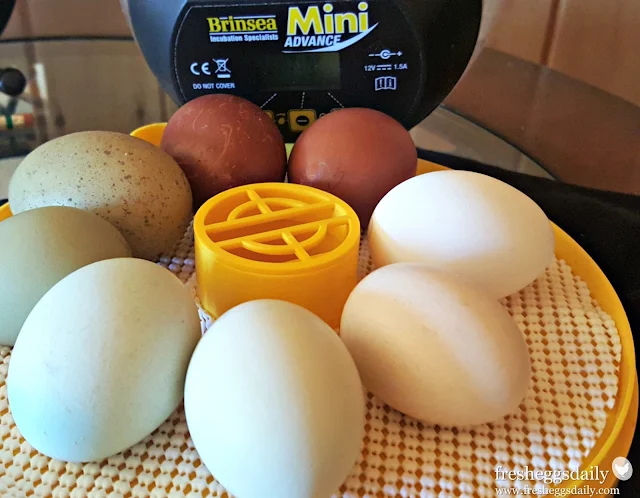
This gorgeous array of hatching eggs arrived last week, beautifully packaged for minimal damage to the eggs.
If you aren't ready to start hatching the eggs right away or don't have enough eggs collected, you can store them for up to 7 days in a cool (60 degrees or so) spot, at a 45 degree angle, pointy end down.
Turning the eggs a few times a day will help keep the yolks centered, which can result in better hatch rates. Hatching eggs do need to be handled differently than eggs you collect for eating.
After 7-10 days, egg fertility starts to drop considerably, so try to incubate the freshest eggs possible and time receiving your eggs for when you have a broody hen if you can.
Hatching under a hen will generally give you a better hatch rate, but if you aren't lucky enough to have a hen cooperate, there are several incubator brands on the market for you to choose from.
I personally recommend using a Brinsea incubator. I love my Mini Advance, but whatever brand you choose (or if you decide to make your own), be sure to test the temperature and humidity to be sure you can maintain a constant environment throughout the hatch.
A temperature change of even a degree or two can be disastrous to embryo development. Be sure the incubator is set away from sunny windows, and in a place where it won't be disturbed by children or pets.
Keep it Clean
Making sure your incubator is clean (I use white vinegar to disinfect mine after each hatch), and washing your hands both before and after handling the eggs is critical to maintaining the integrity of the hatching eggs.
If bacteria gets inside the shell, it will multiply quickly in the heat and kill the developing embryo.
If you're hatching eggs under a hen, be sure her nest stays clean.
Put feed and water near the nest so she she doesn't have far to go to eat, and encourage her to get off the nest at least once or twice a day. Take that advantage to remove any feces from the nest that might contaminate the eggs.
Turning the eggs is probably the most important aspect of hatching. You really can't turn them too often. Turning keeps the yolk (and embryo) centered in the egg.
Just be sure to stop turning three days before the hatch date. The chick needs time to get into position and get ready to hatch.
The good news here if you're using a broody hen is that she'll handle the turning herself, so you don't need to worry about that.
Just be sure to stop turning three days before the hatch date. The chick needs time to get into position and get ready to hatch.
The good news here if you're using a broody hen is that she'll handle the turning herself, so you don't need to worry about that.
Following these simple tips can result in a more successful hatch and better hatch rate for you.
Get everything you need to hatch chicks from our friends at Brinsea!
Shop Brinsea on Amazon
Further Reading:
I would love for you to join me here...
©2016 by Fresh Eggs Daily, Inc. All rights reserved.


