The Beginners Guide to Hatching Duck Eggs [with egg candling photos]
Hatching duck eggs is similar to hatching chicken eggs, with a few noticeable differences, namely the incubation period and humidity levels required.
The most glaring difference is that duck eggs take 28 days to hatch. A week longer than chicken eggs.
But if you know the basics of hatching chicken eggs, then hatching your duck eggs will be familiar territory.
However, it will likely go more smoothly and be more successful using this beginners guide in which I detail the day-by-day progress of hatching duck eggs.
In more than a decade, I've only had two ducks commit fully to going broody and sitting on fertile eggs for the duration. So most of the ducklings I've hatched over the years have been in an incubator.
There are pros and cons to using an incubator versus a broody duck. But either should work about the same!
If you have a drake, then you can try hatching your own ducks' eggs. If not, it's pretty easy to find fertile hatching eggs online from various hatcheries and breeders.
So I just put six fertile Saxony duck eggs in our Brinsea Mini Advance incubator and in 28 days hopefully we will be able to watch six ducklings hatch from those eggs!
The Beginners Guide to Hatching Duck Eggs
Getting Started Hatching Duck Eggs
First you will need either a broody duck or an incubator to hatch your eggs (or you can try hatching them under a broody hen!)
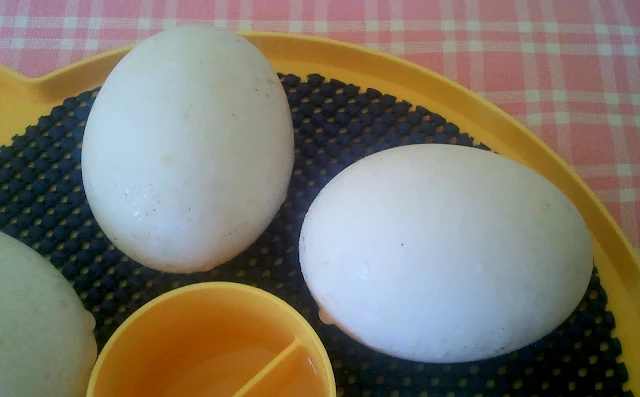
Then you will need some fertilized eggs. Our fertile duck eggs arrived in the mail today!
As a general rule, you don't want to wash your hatching eggs and if you're collecting your own eggs, you can store them for 7-10 days in a cool, dry location with the pointy end facing down while you're collecting all the eggs you want to hatch.
To get started hatching duck eggs
- Don't wash hatching eggs
- Choose fairly clean eggs of good size
- Store (or let shipped eggs settle) pointy end down to keep yolk centered in the white
- Candle each egg with a flashlight or egg candler to check for cracks and use softened beeswax to seal minor cracks (read below for more about candling)
Don't Wash your Duck Hatching Eggs
You don't want to wash off your hatching eggs. The eggs have an invisible "bloom" on the outside of the shell, that will gradually disintegrate, that monitors how much air is getting into the egg - and how much moisture is getting out.
The bloom also helps prevent bacteria from getting inside the egg.
Prepping the eggs for Hatching
I gently cleaned off all the dirt and shavings that I could with a dry paper towel and then let the eggs sit out at room temperature for a few hours in an egg carton, pointy end down, on the kitchen counter, just to let the yolk recenter itself a bit.
It's important to wash your hands before and after handling the eggs.
The egg shells are porous and bacteria can easily be introduced through the shell which will kill the baby duckling. Also careful handling is important so the eggs don't get dropped.
While I was waiting for the eggs to settle and adjust to room temperature, I candled each one looking for tiny hairline cracks that might have occurred during shipping, but they all looked great.
Candling your Duck Hatching Eggs
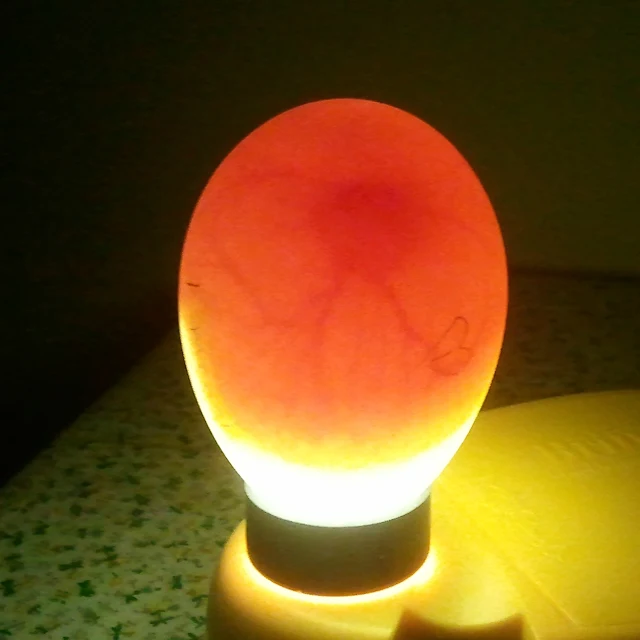
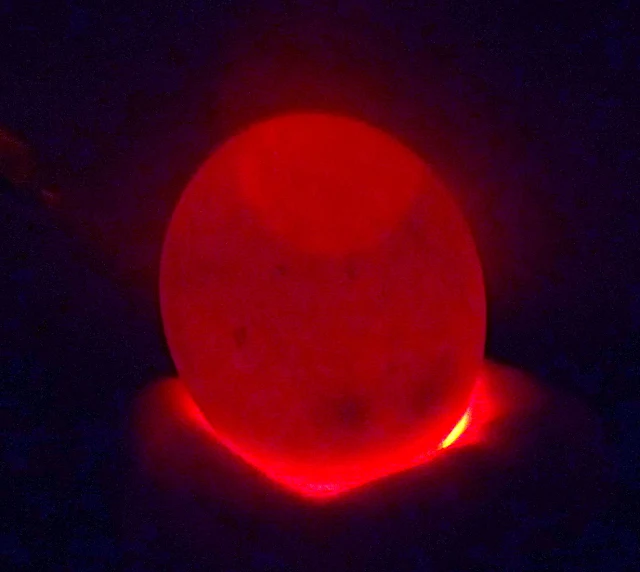
Candling merely means shining a directly beam of light through the eggshell of a developing egg to look for signs of the embryo growing inside the egg. Originally a candle was used to shine the light, hence the term "candling".
Before you set your hatching eggs, you should also candle them to look for cracks which could cause the egg to become contaminated and not hatch.
Once the incubation period has started, you can also check for a blood ring which indicates bacteria has gotten into the egg and it must be discarded.
I generally like to candle my hatching eggs just before I set them, on day 4, day 7, day 14 and day 21. Eggs that aren't advancing through the development process or are contaminated can be discarded throughout the incubation period.
I find it easiest to candle while its dark outside and just leave the lights off in the room. Then, leaving the eggs in the incubator, just shine the light through each one.
This is my "Official Candling Kit" |
Had there been any tiny cracks, the beeswax bar can be slightly softened and applied to the crack to seal it from air and bacteria without harm to the embryo.
If you accidentally crack an egg during the incubation period, you can also try sealing it with the beeswax.
I just use a regular Mini Maglite flashlight to candle the eggs but Brinsea sells several different types of egg candlers that you can use also.
Care should be taken while candling not to leave the light against the shell for too long.
Marking your Duck Eggs
If you're hatching eggs under a broody hen or duck, it's important to set them all at the same time and then remove any eggs that others lay in the nest after the incubation period has started. It's easier to keep track of which are the original eggs if you mark them.
You can use a pencil or a Sharpie permanent marker. A Sharpie works better under a hen - the pencil can tend to get rubbed off. If you're using an incubator,the pencil works great.
I wrote a number on each egg (1-6) to be able to tell them apart. The number also serves as a reference for the daily turning. I know that every other day the number will be facing up when I'm done turning.
Setting your Duck Eggs in the Incubator
I am using the Brinsea Mini Advance incubator which will hold all six eggs, although I will have to manually turn them because they are too large for the automatic turning tray to accommodate all six.
Some incubators have turning trays, in which case you don't have to worry about marking or turning the eggs.
Temperature for Hatching Duck Eggs
Duck eggs need to be kept at temperatures between 99.3 and 99.6 degrees to develop correctly.
When the incubator was up to temperature and the eggs had been sitting out for about 6 hours, I set them in the incubator with the pointy end facing outwards and the numbers facing up.
Humidity for Hatching Duck Eggs
After setting the eggs, I filled up one side of the reservoir with water, according to the incubator instructions.
Throughout the incubation period, I will monitor the reservoir to be sure it stays filled, topping it off when necessary.
This increases the humidity in the incubator and keeps the membrane inside the shell from drying out and literally shrink wrapping the ducklings.
The humidity for duck eggs should stay between 45 and 55%, increasing to 65% when the eggs begin to hatch.
Since I'm not using the turning tray, I put a piece of rubber shelf liner I cut to fit the base of the incubator.
The shelf liner prevents the eggs from rolling around and also will provide a nice surface for the ducklings feet to grip when they hatch.
If you do use the turning tray, just wait to put the shelf liner in when you remove the turning tray for the lockdown period which is the last 3 days of the incubation period.
Here's the "nursery" I set up with the incubator, my countdown calendar, a pitcher of water to refill the reservoir and my Maglite.
I have the nursery set up in a spare room that doesn't get any traffic, is safe from our dog and cat, and stays a fairly consistent temperature.
I always make sure the incubator is set up away from a sunny window to avoid accidental overheating.
According to my calendar, on June 28th we should have some baby ducklings "eggscape" their egg prisons and enter the world!
The Beginners Guide to Hatching Duck Eggs
So begins the journey.....
Hatching Duck Eggs | Day One
I turned the eggs this morning at 6am when I woke up - each egg is turned a 180-degree turn so the numbers are now on the bottom.
Turning your Duck Eggs
I like to turn my hatching eggs 5 times a day. But this is one of those situations where more is better. Commercial incubators turn the eggs at least every hour and some turn the eggs continuously.
But I've had good luck turning my hatching eggs five times a day on this schedule:
- 6 am
- 10 am
- 2 pm
- 6 pm
- 10 pm
You can choose times that work for your schedule, that are fairly evenly spaced throughout the day.
An odd number of turns each day ensures that the egg spends every other night face up. This is important so that the developing embryo doesn't stick to the membrane and shell.
The embryo floats, so it will rise to the top each time the egg is turned.
As the yolk, which also floats, rises, the embryo will begin to get squashed between the yolk and the shell, so it's important to turn your hatching eggs regularly.
You should turn your duck hatching eggs every day until day 25.
Hatching Duck Eggs | Day Four
After setting my duck eggs, I generally wait until day 4 to candle them. It's a little early sometimes, which is why I candle again on day 7. But sometimes by day 4 you can see some light veining on the eggs.
What you are looking for on day four is the telltale "spider" and some veins forming. The air sac at the wide end should also start expanding.
If you aren't sure about some of the eggs, wait until day 7 and you should definitely be able to tell which are developing and which aren't.
By day four or five the digestive tract, nervous system and circulatory systems have formed. The eyes, ears and brain have begun to form and the heart has started beating.
The embryo has leg bugs and the tail and bill have started to develop. Over the next few days, the legs, wings and beak will begin to form, as will the reproductive organs.
Hatching Duck Eggs | Day Seven
By day seven, you should definitely be able to see embryo development in the eggs. The spider veining will have grow much larger.
Any eggs that appear to still just have a light round yolk in them are likely not fertile and can be discarded at this point.
Hatching Duck Eggs | Day Ten
Misting and Cooling your Duck Eggs
Today is day ten of the incubation period and it's time to begin misting and cooling your duck eggs. This is unique to duck eggs, so I'll explain the concept.
Misting your Duck Eggs
Misting the eggs with warm water (about 100 degrees) draws out moisture from the eggs and promotes the growth of the air sac which gives the growing embryo room to expand and also prevents the duckling from drowning when it is time to hatch
Using warm water ensures that any bacteria is drawn out of the egg also. Misting has the potential to draw bacteria from the outside of the shell (since the hatching eggs aren't washed) to the inside which can kill the embryo.
So it's very important to use warm water when misting your eggs.
I did heat some water in my teakettle and then let it cool down to 100 degrees my first few times misting the eggs, but discovered that if I let our tap run long enough the water does get up to 100 degrees, so in the future, I will just use hot tap water to mist the eggs.
Just a regular spray bottle filled with warm water and a quick spritz once a day is sufficient. This is thought to mimic the wet mother duck returning to the nest after getting something to eat and drink and maybe going for a quick swim.
Cooling your Duck Eggs
When you mist your duck eggs, the cooling effect of the evaporating water also serves to cool the egg down. Periodic cooling of waterfowl eggs has been studied and is thought to have beneficial effects on hatch rates. It is, in fact, recommended by the leading waterfowl expert, John Metzer.
It is recommended that before misting your duck eggs, you remove the lid of the incubator (or remove the eggs from the incubator) for 10-30 minutes every day starting at about day 10 of the incubation period to let the eggs cool slightly - again mimicking a mother duck leaving the nest daily to feed and drink.
(The drawback to this of course is having to remember to replace the lid because if the eggs cool down too much you can delay the hatching by a day or two.)
While lowering the temperature of a hatching egg merely slows down the embryo's growth, raising the temperature just a few degrees for even a few minutes can kill the embryo, so if you do forget to put the cover back on, don't give up hope of your ducks hatching.
You should leave the lid of the incubator off (or the eggs out of the incubator) until they feel just about room temperature. Neither warm nor cool. Then mist each one and replace them in the incubator.
Eggs should be cooled and misted from day 10 to day 25.
Hatching Duck Eggs | Day Fourteen
Candling your duck hatching eggs on day 14 should reveal some serious development of the embryo inside the shell. The air sac in the blunt end of the egg will have grown larger.
This holds air that the duckling will breathe before it breaks out of the shell on day 28.
Hatching Duck Eggs | Day Twenty-One
By now the developing embryo should just look like a large dark blob. It is hard to see much of anything, but an expanding air sac is a good sign that the duckling is continuing to grow.
The air sac should be taking up anywhere from 1/4 to 1/3 of the total space inside the egg at this point.
Hatching Duck Eggs | Day Twenty-Five
Three days left! Tomorrow is "lockdown". That means that today the eggs will get one last candling, cooling and misting and then the incubator won't get opened again until the eggs hatch.
I filled both reservoirs in the incubator with water and reduced the temperature in the incubator to 98.6 degrees. Now its up to the ducklings to go to work and commence hatching!
The eggs will no longer be turned after today. This allows the duckling to get into "hatch position". Turning the eggs after lockdown could disorient the duckling and result in it not being able to break out of the shell.
The incubator will remain closed until the first ducklings hatch, have dried off and are getting active and indicating that they are ready to be transferred to the brooder.
Hatching Duck Eggs | Day Twenty-Eight
The Pip
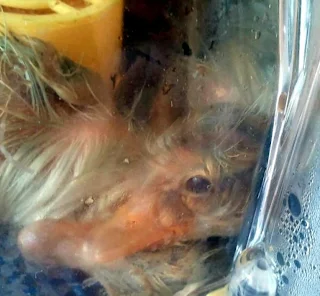
Right on time, my duck eggs started hatching! The first sign is the "pip". The pip is a small hole that the duckling breaks in the eggshell at the rounded end.
Once the duckling has broken through the membrane and shell and is breathing on its own the air in the incubator, it will often rest, sometimes for hours, so don't panic and don't try and help the duckling out!
The Zip
Once the duckling has made the pip hole and rested a bit, it will continue working on breaking out of the shell.
You will likely hear some peeping coming from inside the egg, as it cracks a circle around the top of the shell (which is called "zipping"), so it can finally kick the top of the shell off with its feet - and hatch!
This zipping and ultimately hatching can take even up to 24 hours after you see the first pip occur. There us usually a bit of a wait between the pip and the zip, but once the zip happens, the duckling usually hatches pretty quickly after that.
I leave the ducklings in the incubator to rest and dry off for up to 24 hours. Since the humidity level in the incubator will drop each time it is opened, I don't like to open it until several ducklings have hatched.
And I don't want to move them to the brooder until they are completely dry and fluffy and start getting active and moving around.
They really just need to rest after they hatch, so there's no rush to move them - and I think that they encourage the other eggs to hatch with their peeping!


